Monday, June 17, 2013

Publishing to iBooks using only an iPad and the Internet

Here was a fun challenge that I wanted to do for my daughter's 4th grade class: publish an e-book to the iBooks application on an iPad, using only the software on a web-connected iPad. I know this is technically cheating since once you open the web, you can do anything, but still a fun little project.

Anyway, here's the recipe I ended up using...

Introduction

There is no better way to learn new skills than to get out and try it!  Like most things in technology, publishing your stories to iBooks can be accomplished many different ways.  The purpose of this document is to explain just one of the ways to accomplish this goal, using software that is available at Tustin Memorial Academy.  Good luck!

Write Your Story

This is the step where you get to let your creativity flow!  
  1. Log on to Google Drive: https://drive.google.com.
  2. Click the red "Create" button and select "Document".
  3. A new blank document will be opened and you can write your story.

Converting into EPUB (iBooks) Format

When you are ready to turn your story into an eBook, follow these steps:
  1. While editing your story in Google Docs, Select the "File" menu, and then click the "Email as Attachment" option. 
  2. On the Email as Attachment window, select the following options:

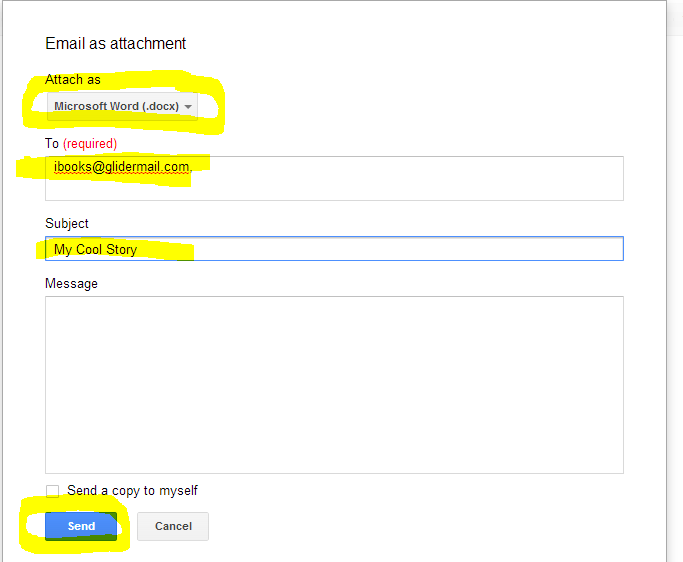
  • Attach as: "Microsoft Word (.docx)"
  • To: ibooks@glidermail.com
  • Subject: Can be anything you want, but a good idea would be to put the name of your story here.
  • Click the "Send" button.
  1. Wait for the email reply (this may take up to 15 minutes--sorry for the delay here!).
  2. Once you get the email reply, click and hold on the link to the file.  When the menu pops up, select "Copy".
  3. Then click on the Online-Convert.com link at the end of the email: http://ebook.online-convert.com/convert-to-epub
  4. On the Online-Convert form, fill out the form:
  • Tap and hold in the "URL" field.  When the clipboard menu pops up, select "Paste".  This should be the document URL you copied from step #4 and should start with "https://locker.ifttt.com/"
  • Change the "Target ebook reader" option to "Apple iPad".
  • Enter your book title and author information.  
  • The remaining options can be left unchanged.
  • Click the "Convert file" button.
  1. The conversion should only take a few seconds.
  2. When complete, Safari should prompt you to open the downloaded file in iBooks.
  3. Enjoy reading your story on the iPad!

Sunday, September 2, 2012

Pushover Bookmarklet


Pushover Bookmarklet

This bookmarklet sends a notification through Pushover that contains the current web page in your browser, with link.
This is tested and working for my installations of Chrome and Firefox.   No guarantees for your setup!

Token:
User Key:
You can find your user key on the main Pushover page after logging in.
Title:


Thursday, February 19, 2009

RIP: Delegate RTM

If you hadn't figured it out from the lack of updates, this extension is dead. You can essentially accomplish the same thing using the official RTM extension and configuring either stars or a specific label to trigger task creation. Good luck!

And, if you were worried, I am still as avid a supporter as ever for Remember the Milk!

Friday, August 3, 2007

Random Quotes with Javascript

[Note: This post has already inspired my next topic.... formatting code in blogger posts. This looks absolutely terrible. I apologize for any squinting-induced headaches]
Here's some javascript that I whipped up in order to teach myself some javascript fundamentals. My background is very OO and I had always thought javascript could not be object oriented. I was wrong!

function Quote( author, quote ) {
this.Author = author;
this.Quote = quote;
}

Quote.prototype.displayQuote = function() {
return '“'+ this.Quote+ '”';
}

Quote.prototype.displayAuthor = function() {
return this.Author == "" ? "" : " — "
+ this.Author.replace(/\s/g, " ");
}

Quote.prototype.toHTML = function() {
return this.displayQuote()+ this.displayAuthor();
}

Quote.prototype.render = function() {
document.write( this.toHTML() );
}

function Quotes() {
this.array = new Array();
}

Quotes.prototype.addQuote = function( q ) {
this.array[ this.array.length ] = q;
}

Quotes.prototype.add = function( author, quote ) {
this.addQuote( new Quote( author, quote ) );
}

Quotes.prototype.render = function ( index ) {
this.array[ index ].render();
}

Quotes.prototype.renderRandom = function () {
this.render( Math.floor( Math.random() * this.array.length ) );
}

var q = new Quotes();
q.add( "Pablo Picasso", "Bad artists copy. Great artists steal." );
q.add( "William Shakespeare", "The robb’d that smiles, steals something from the thief." );

//ADD OTHER FAVORITE QUOTES HERE

q.renderRandom();


So, what does it do? It creates a "class" (I may get jumped by the javascript nazis, but to this old school java--and more recently c#--programmer that's what it is) Quote that contains a quote and author, and has some simple display methods. Then a second class, Quotes, that just acts as a simple collection, with a randomizer function that spits out a ready to use quote for a web page. If you are reading this page on the scroungelounge blog, then you can see it in action at the bottom where my random quotes are displayed. Refresh the page if you don't believe me, it will (most likely) change!

For even better reuse, break out the "class" definitions to a separate file and use an include in the header:
<script type="text/javascript" src="quotes.js"></script>

Then just drop the quotes of your choice later on the page:

var q = new Quotes();
q.add( "Erik", "When you only add a single quotation here, the random results are pretty boring" );
q.renderRandom();


And there you have random quotes on your page in just a few lines of code. Now obviously there are probably easier, more straightforward ways of displaying a random quote, but my objective was to improve my javascript skills:

Skills["javascript"].IsImproved() == true
// mission accomplished!


If you want to see some great info on object oriented javascript (and get the technical scoop on from which this javascript hacking was based), read this article. Killer stuff Jonathan!

Friday, July 13, 2007

Firefox Extension: Delegate RTM

Here's a new Firefox extension—well, ok, maybe "repurposed" would be a better description—that adds an "Add to RTM" (that's Remember the Milk, the brilliant online task list service if you don't know) link to any message in gmail. You can see the link in the screenshot right next to this extension's big brother, DelegateGCal.


[Update: You can see what an extension newb (rhymes with boob) I am by not even knowing how to post it right! For now if you want to try this out, looks like you will have to right click and "save as" if you want to download it.]


[Update #2: Here is the extension on the official mozilla addons page (login required to access the "sandbox" area). If you download the extension, please add a review on the mozilla page so that I eventually can make this publicly accessible. -Thanks]

[Update #3 (last one I hope!): This extension is now available for public consumption on the official mozilla addons page. Enjoy!]

Clicking on the "Add to RTM" opens up a new gmail message window, prefilled with all of your RTM preferences and most importantly a link back to the message itself.

Credit to ano.malo.us for the original implementation that this extension is blatantly ripped off from based on.

I welcome anyone to take this and run with it, modify it, hack it, or whatever else you can think of. My skills are a bit lacking in this area, but I'm sure that someone reading this will be able to improve upon my rough work. Off the top of my head, I'd love to see this working using the a slick popup widget; the original extension that this is based on uses a GreyBox popup window, but I couldn't get the Gmail compose window to be happy in one. Or maybe even better, what if clicking the "Add to RTM" button simply forwarded the message using the gmail forward functionality (no popup needed!)? I tried off and on for a week and just didn't have the javascript chops to get that worked out. If somebody else can, you will be my hero.

I learned a ton on this mini-project about firefox extension building and javascript, two new areas of development for me. Seems to me there are a lot of "head scratchers" in both!

I'd love to hear about what you make from this, so speak up!

Sunday, July 8, 2007

Kick Off

This is just a quick note about the launch of this blog. I'm not sure how much content will be published here, but after landing on other blogs during my code searches—and finding many worthwhile technical hints—I decided I should give back to the community.

I doubt many of the public at large will be regular readers, but if you are like me, you ended up here from some technical google search. Or you're interested in a project that I've put out. Either way, feel free to steal whatever you see here and if you have questions or suggestions then fire away!